Grasleysfjöll Inversion

Like a surreal night scene.
Or perhaps a view from standing on the Moon.

Some of my images work very well when inverted. Others do not. This one of a mountain range in the central highlands of Iceland works very well.

Inversion-Grasleysufjoll-1.jpg

Shot in the depths of winter when there are no roads, nothing to speak off, I noticed that the wind had swept part of the mountainside off. We saw just faint black lines hovering in space. I asked my guide / driver to take me closer (we were on a valley floor) only to find he went much further than I thought we could - he took the vehicle up the side of the hill in deep snow to the brow of the hill. This photo was made from just a few steps outside of the car.

The inverted photo has a completely different meaning for me. The feel is completely different and it almost feels as though I am standing in some surreal night scene, or perhaps standing on the Moon.

Share

Breaking the spell / building a new one

Motifs are very important in my photography.

I can see them more clearly when I remove the ‘landscape’. When I remove the auto-response to go ‘this is a picture of a piece of reality’.

Inverting an image of scenery forces the viewer out of their comfort zone.

It helps to break the illusion or spell that photos are ‘real’. They’re not. In the place where ‘reality’ existed, there now exists an abstraction. One that hopefully casts a new kind of spell over us.

Hokkaido-2018-(20).jpg
Share

Inversions

We should all be pushing the boundaries of our work. We should be trying to push the boundaries of what the norm offers. We can grow so much by entering areas of photography that we have not visited before.

For me, I’m more interested in the edge of reality, of the edge of definition. By inverting my photos I have broken that spell that says ‘this is a capture of reality’, and set a new contract between the viewer and myself. The work is no longer verbatim. Instead it is much more open to being interpreted in any way possible.

Inversion.jpg

You may dislike the work, or find it too strange. But I think that’s good if it generates that kind of response.

For me, I’m just exploring. I have yet to reach an opinion, and indeed, feel that trying to strive for one so early in any direction or path I take would be a bad move.

Right now, I’m just enjoying seeing familiar work anew. I’m noticing different things in familiar images but most importantly, they feel quite different. There is a different atmosphere to these.

Art, photography, craft, whatever you call it. It is allowed to be transient, to be a product of the moment. Why does everything have to be produced with the intention that it last forever?

Grads still have a place in digital photography

Today I’d like to discuss the validity in still using Grads in an age where digital cameras have so much dynamic range that many believe that grads are no longer required. To do this, I need to go over what happens to the exposure when we apply grads.

Yesterday I discussed why using Aperture Priority is better than using Manual, particularly when using grads. Aperture Priority automatically re-balances the exposure as the grad is applied:

exposure-grads.jpg

As you can see, the grad reduces the difference in contrast between sky and ground. And since the camera wants to take an average between the two values, we find the sky and ground moving towards mid-grey (18%).

In the above illustration you can see that the ground values are now lighter once the grad has been applied. This is key to my post today. When you apply grads, what you are essentially doing is opening up the shadow detail in the histogram / exposure of the photo.

sky-ground.jpg

Consider the histogram on the left. No grad was applied, so we end up with a classic ‘double humper’. The ground has been squeezed into the lower tones of the histogram while the sky has been squeezed into the upper registers of the histogram.

Note where 18% grey is.

The ground is essentially underexposed, while the sky is overexposed.

Also consider that the ground is residing in the shadow ‘darker’ area of the histogram. This results in loss of tonal information in the shadows as many dark tones are being quantised. Many tones become one.

Now let’s consider the same image shot with a graduated filter:

sky-ground.jpeg

The ground values have been moved towards the middle area of the histogram. Same for the sky values. The important points to consider are:

The shadow information has been opened up (marked in red). We now have more tonal information stretching over a longer tonal scale way down into the shadows.

The highlight information has also been opened up (marked in red). We now have more tonal information stretching over a longer tonal scale way up into the highlights.

For me, the main reasons why I use grads are:

  1. I wish to avoid underexposed ground and overexposed sky

  2. I want to go home with a pleasing negative to work with.

  3. I don’t want to have to jump through additional hoops in the processing to figure out if the image is any good. Working with an image where the sky is overexposed and the ground is underexposed isn’t very inspiring at all !

  4. if I didn’t grad, I’d have to process every file I shot to see if they were any good before I began work.

  5. Working with a nicely balanced exposure straight out of the camera can be, and often is, a very inspiring way of working. You can see straight away whether the composition and image works or not, and I remain engaged.

Engagement is the key for me.

I don’t want to struggle with bad exposures to make them nicer. I want to work with images that inspire me, and that means pleasing, balanced exposures.

If I go home with a nicely balanced exposures, I am more likely to work with them. Conversely, having to trawl through hundreds of images with dark foregrounds and bleached out skies wondering if they might be good once I’ve put them through my editor of choice isn’t going to fuel my creativity. And it’s certainly not going to inspire me.


Light meters are dumb, they just try to turn everything 18% Grey

This is not a complaint. It’s just a fact. And something we all need to understand about light meters.

Here are some fallacies:

  1. There is such a thing as the correct exposure

  2. Metering something gives its correct exposure

Here are the truths:

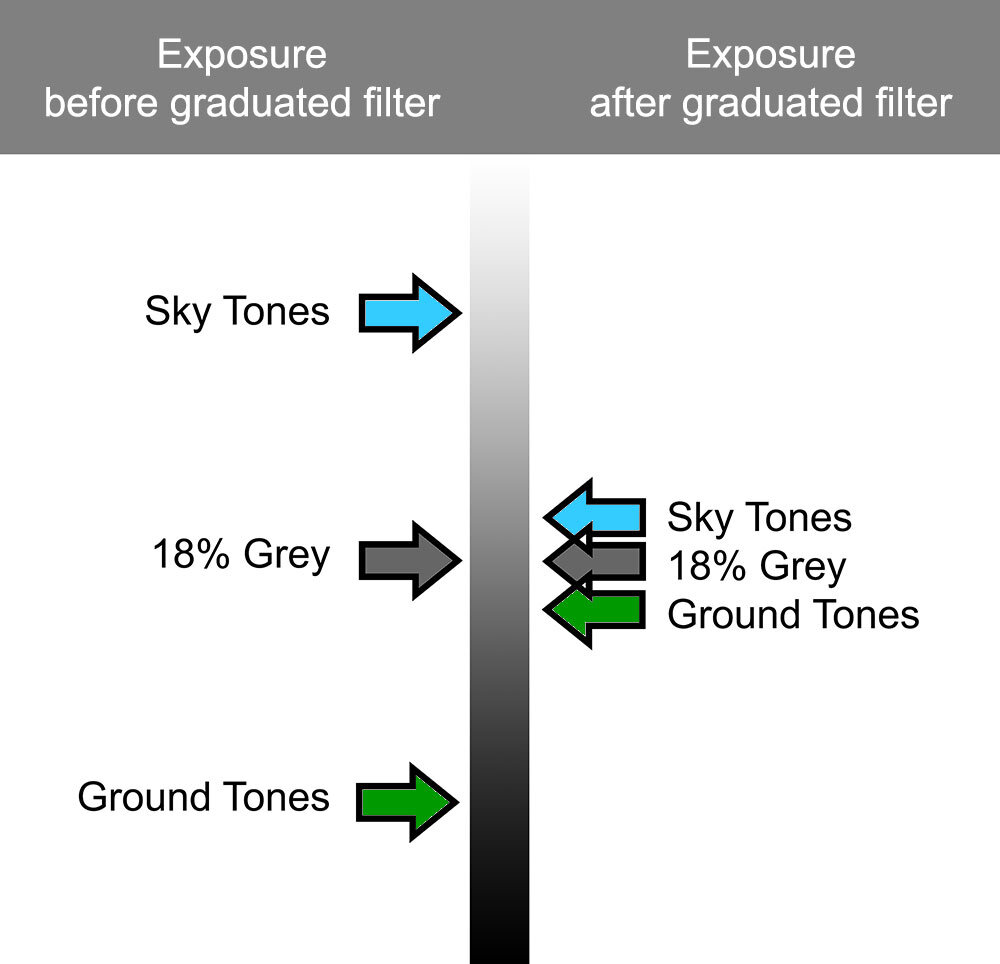
  1. Metering something gives the exposure values to turn it 18% grey

  2. You choose which part of the scene is turned 18% grey, and let everything else transpose around that.

Why 18% grey?

There are a number of reasons for why 18% grey was chosen:

  1. A light meter has to set the exposure for something. So an average value is as good as any. Most things look about right when exposed as an 18% grey subject.

  2. The human eye perceives most things as a mid-tone.

With point 2, let’s consider this some more. If you point your camera down at the ground and take a shot of your feet, and check the picture, the image will look about right. If you also check the histogram it will be right in the middle of the graph. The shot has been exposed as an average (18% grey) and it looks about right. Now do the same with the sky. Point the camera right up at the sky so the entire sky fills the frame and take a shot. The photo will look about right, and guess what: the exposure will be right in the middle of the histogram. Another 18% grey exposure.

So the human eye tends to perceive most things as an exposure around 18% grey. Knowing this, and also knowing that your light meter is trying to turn everything 18% grey is useful.

For me, all I need is Aperture Priority and Exposure Compensation. When shooting a scene I let the camera work out the average value (18% grey) and if I feel it’s underexposed (as will happen with snow white scenes as the camera tries to make the snow 18% grey) I can apply compensation of maybe +1 or +2 stops.

Exposure is pretty simple. Camera light meters are really dumb. They just try to take an average all the time and make the scene 18% grey. There is no such thing as ‘the correct exposure’, and the meter reading you get is the values you need to turn the subject 18% grey. That’s all a light meter does.