Black sand, white ice - metering?

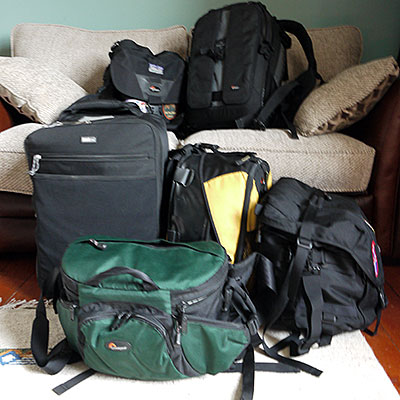
When I visited the black sand coast line at Jökulsárlón (glacial lagoon), in south east Iceland this June, I had a bit of a problem trying to figure out how to meter the scene. I've been a film shooter since the late 80's and feel I know my medium well. I use a Sekonic 758 meter at present (although I personally wish I'd not bothered, and stayed with the superb 608 meter instead). Both meters are fine, but the 608 allowed me to see at a snap the shutter speeds for all the meter readings I record (the meters allow me to take up to 9 different spot readings of a scene).

But every now and then, I come across a landscape I'm not sure just how to meter.

My usual technique is to meter the darkest area of the picture (usually the ground) and then meter the lightest area of the picture (usually the sky) and see how many f-stops there are between them (dynamic range). I know my film can handle around 4 to 5 stops of dynamic range, and that the real world often exceeds this. My Sekonic is a snap at telling me how much contrast there is in the scene and if it exceeds what my film is capable of recording, I will use an ND grad filter to reduce that dynamic range, so I can squeeze the scene onto my film without having any blown highlights, or blocked shadows.

But I have to set the exposure somewhere between the darkest and brightest parts of the scene. If I choose to set the exposure to the meter reading for the black sand, I will make the sand mid-grey. The same with the sky. If I meter the sky and use that for my exposure - I will make the sky mid-grey, and most probably seriously underexpose the black sand.

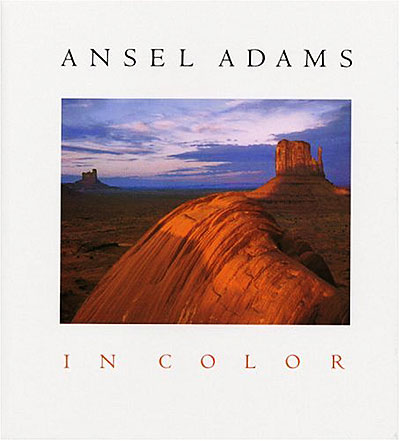
Using the zone system that Ansel Adams developed, I tend to go on the principle that if I want an object, such as the ice to be brighter than mid-grey, I will meter the ice, and then add 1 or maybe two stops. But in this picture, I simply looked at the dynamic range of around 5 stops and decided I needed to expose right in the middle. This would mean that the sand would be 2.5 stops below my exposure, and my ice and sky would be 2.5 stops above. I used a 2 stop hard grad to control the brightness of the sky, which meant that the sky and ground had a similar luminance, while the ice would be 2.5 stops over.

I wasn't sure at the time if I was getting it right. I just decided I had to go with my evaluations of the scene and prey that I'd not screwed up.

When I got home, I completely forgot to consider how difficult the exposures had been whilst at Jökulsárlón, because all the images came out beautifully exposed. This is a lesson in itself. We often don't question why an image worked. It's good to realise that what you did at the time of capture was correct, and learn from that. Conversely, the images that didn't work are just as important. Often, photographers quickly discard the images that failed, but so much can be learnt from them.

With my camera system, I sometimes forget I have a full ND filter on the camera, sometimes I don't take that into account when making my exposure. I'll sometimes see images where the exposure is so off, that it can't have been through bad judgement, but through bad practice. Workflow is everything. Get yourself organised and cut down any possible error when making images.

More December Planning

I'm almost ready to get the credit card out and book a flight to Norway for this December. I noticed on The Photographer's Ephemeris that there are no details for sunrise and sunset from the 11th of December onwards. This at first, was a little strange to take in, until I realised that the sun does not rise above the horizon and therefore, nor does it set. The place is in perpetual darkness from the 11th of December until the 3rd of January, as you can see here in this screen shot of TPE:

As you can see (click to see a larger view), there are no times for the sun (or the moon for that matter) on the 11th of December. So this means that I need to plan my trip to go a little earlier in December.

Personally, I wish to experience the perpetual darkness, so having perhaps most of the week with some sun, and maybe a few days of perpetual darkness is something to plan for.

But what about the twilight time? I love shooting in twilight and my friends in Lofoten tell me that it never really gets absolutely black, so let's study TPE for twilight:

As you can see (click for larger view), there are recordings for twilight. I'm interested in Civil twilight as that is the twilight where objects are discernible to the eye. You can see that on the 11th, although there is no sun, civil twilight begins at 9:12am and finishes at 14:48 in the afternoon. So I have 5 and a bit hours to shoot in twilight.

So what is actually happening to the sun throughout the day? With civil twilight, the sun is -6º below the horizon, so let's look at TPE's details tab:

You can see that the sun is around -6º below the horizon at 9:11am in the morning, and the sun gets a little higher than that until it starts to dip around 2pm. The yellow part of the curve is the angle of the sun throughout the day. The blue curve is the angle of the moon throughout the day. So if we look at the graph, we can see that the sun never gets above the horizon.

But the good news is that I have around 5 hours of twilight to shoot in. Very worth hanging around for, and not heading off home early, like I initially thought.

Lofoten in December

Due to unforeseen circumstances, I've had to cancel my personal photographic trip to Lofoten this week. But the good news is that I will be going back in December for just over a week to do my own photography. I feel that some places are an ongoing project and Lofoten has certainly captured my imagination in that respect.

Looking at The Photographer's Ephemeris for mid December, I see that twilight begins a little before 9am (how civilised), and ends around 11am, giving me two hours to shoot in the moody light I like each morning and each night. Sunrise starts and 11am and Sunset is at 12:30pm, meaning the sun is above the horizon for an hour and a half. Twilight begins from 12:30 and ends around 3pm.

I don't know about you - but for me - this is a perfect photography schedule. Not up too early (I'm not an early riser by habit), and all the great light happens in a condensed period of time.

I can't wait.

PixelGenius - Sharpening

For years folks have gone on about the perils of sharpening images. Some completely over do it, while others don't do it at all. It is a religion for a lot of photographers, and I must confess, until recently, was one of them.

Way back when I first started using Photoshop, when I was a newbie to digital imaging, I would sharpen everything I scanned. It was exciting. It made the images look really impressive. What I didn't know at the time was that sharpening can have side effects on the quality of your images when it comes to resizing them at a later date. So as I became more aware of sharpening and its issues, I began to not sharpen anything at all.

For those of you who do not know what sharpening is, I must stress that it is not a feature that adds detail to any image. It is a feature that gives perceived improved resolution by adding contrast to the edges of objects within the frame. Over do it, and the picture can start to look hard. Halo effects can be introduced too if you're not too careful. IMHO, it takes a long time to perfect the amount of sharpening and ratio of sharpening effects that should be applied to an image. This is directly attributable to our ability to look at a photograph (it takes years to be able to read a photograph on a technical level) and also, the quality of the monitor we use to apply the sharpening with.

A few months ago, while I was researching printers and workflow - which I am extremely happy with, I was introduced to PixelGenius. It is a sharpening plug-in for Photoshop and it can help you make a good print an excellent print. It can also help you sharpen your images for the web too. I've had amazing results from using the product to sharpen for web and of course, with inkjets too.

Where I was once deadly against sharpening, I'm now all for it..... with some caveats:

1. My original files are left unsharpened. 2. I duplicate my TIFF scans and resize to the medium I want to use them for 3. I sharpen after resizing, not before

There are several reasons to use sharpeners such as PixelGenius. They help overcome issues with scanners and digital sensors creating soft images. In digital sensors, anti-aliasing filters soften the image to reduce moire patterns. Not all device captures are perfect, so Pixel Genius has three stages of sharpening:

1. Capture Sharpening 2. Creative Sharpening 3. Output Sharpening

As the names suggest, they have preset sharpeners for the capture medium. I use 6x7 medium format film, and I find the '6x6 positive film sharpener' fantastic for this.

The creative sharpeners are used in the same way we use dodging and burning. You dodge an image to bring prominence to that part of the scene and you burn in areas where you want to make the area darker and therefore lead the eye away. The same is true for sharpening. Sharpen the entire file and your eye may be distracted by objects that have too much detail in them (yes, that's right - too much). By applying creative sharpeners to certain areas of the scene, you can lead the eye towards, and also away from certain areas of the scene.

And finally, the output sharpening algorithms are fantastic for helping you get the best jpegs for web and the best results for sending files to your inkjet printer. If you're not doing anything like this, then your prints aren't half as good as they could be.

If you'd like to read more about Pixel Genius, then they have an excellent user manual which is available for free on their web site.

Sharpening is a creative part of the image making process. It is just as important as contrast masks and dodging and burning. By reading the PixelGenius user manual, you'll not only get a good education on sharpening and why you would want to use it, you will also get an introduction to a plug in that simplifies sharpening for you, making it easy for you to get great results, while cutting down the possible chances of making bad mistakes with your image editing.

Photo books as an investment?

This past Saturday, the Guardian news paper here in the UK ran an article about Photographic books. To summarise, they suggested that buying photography books from unknown photographic artists is a good way to invest for the future.

I would agree that certainly, limited edition copies of photographic books are very collectable. Whether they will help you in your retirement is another matter.

If you haven't guessed yet, I'm a bit of a collector of photographic books. (I just bought Bill Schwab's 2nd edition of Gathering calm to sit nicely against the first edition, and I also bought Rolfe Horn's 28 Photographs). I find them immensely beautiful objects to own, and a very absorbing way to appreciate someones work. Just a few months ago I reviewed Michael Kenna's Huangshan book, which I still think is one of the most beautifully printed books I've ever seen. Printed on high end Japanese uncoated art paper, the photographs take on a spirit and a feeling I could never get from browsing a web site.

To digress a little, my own book is being printed by the very same printer, and they have let me know that there was a lot of time and effort that went into sourcing the paper and inks for Huangshan.

Anyway, I digress. Huangshan is almost sold out (it was limited to 1,000 copies) and prices on the web are rising steadily. It's only been out for 4 to 6 months.

So I'm wondering - maybe there is something in the Guardian's article. But ultimately, I would prefer to collect books because I love them, appreciate them, and enjoy getting lost in their contents for a few hours now and then. That to me, is priceless.

ps. If you're interested in any of these books, you can get Gathering Calm from Beyond Words book shop, but I think that Rolfe's book is now out of print. Best to ask Neil if you do enquire or go look on Abebooks (second hand site), but expect prices to be high for books on Abebooks due to the collect-ability of photographic books i've just been discussing.

The Nature of Camera Bags

Over the past decade, I've managed to accumulate a rather large collection of camera bags. I came to this realisation yesterday after getting a nice email from the guys at Think Tank in the USA. They wanted to know if I'd had any experience of their camera bags. Well, I do own an Airport International bag, that I bought around three years ago. So they're going to send me a couple of bags that I think might be of use to me. I'll let you know how I get on with them in due course.

In the meantime, I did a little stock taking and found that I have:

Lowe Pro Trekker II Lowe Pro Orion AW waist level bag Lowe Pro Dryzone 200 LowePro Vertex 200 LowePro Reporter 400 LowePro Reporter 600 Think Tank Airport International

All of which, are great bags - but none fill the role of being everything that I need for all my photography projects. I just can't seem to find a bag that fits all my requirements. Which I guess is similar to not being able to find a camera system that fits all my requirements.

One thing I would like to say about camera bags, is that I prefer them small. A big camera bag means I'm going to fill it. The temptation is always there and I know that if I do fill a large bag, my trip turns into an endurance test because of all the cumbersome weight that I'm carrying (I'm talking about the bag - not me). A small bag forces me to be very selective about what I take, and make sure that the lens, body, filters I carry are going to be used.

I think we often think about accumulating lenses and gear. The more we have, the more options we will have when we go out to shoot. I suffer from the temptation to take every focal length of lens that I own, in the chance that I might see some amazing macros and also some amazing 400mm shots too. The truth is, having all this gear just makes for too many choices and confusion when we do come across something worthy of a picture.

I remember when I went to Iceland in 2004. I took the little Orion AW waste level bag with me and I managed to cram in my Mamiya 7II, three lenses and Lee Filters. It was compact and I could (almost) sling it around my waist. I had to be ruthless about what I took, and I found that every item I had with me was used on the trip.

If I were to distill into a few sentences what I'm looking for in a camera bag, it would be:

1. Quick access to cameras and lenses 2. Waterproof 3. Easy to lock up

The ultimate thing for me is the access. I hate having to wrestle with a camera bag. I also hate having to take ages to pack things away. That's why I have a preference for waist level bags in previous years because I can often get into the bag very easily without having to stop and lay it out on the ground like a backpack. I'm in my 40's now (you'd never know it - well, that's what I keep telling myself), and I find that the days of carrying a waist level bag are perhaps over for me. I need something with equal weight distribution for my back and so these days, you'll often find me with a backpack on (comfortable, but completely useless at getting access to stuff quickly - and how many times have I thought the bag was closed up and I get ready to put it on my back, and lenses start tumbling all over the place?).

Maybe you have some suggestions of bags that you rate. Or bags that you don't. It would be nice to hear from you, and by all means, if there's any bag in my collection you'd like to know more about - just add an entry to this post.

ps. I intend to do a review of some of my bags.

Understanding Light eBook now Available

Stephen Trainor and myself are very pleased to announce the release of  Understanding Light with The Photographer's Ephemeris eBook.

The book explores how to improve your photography through an understanding of natural light. The eBook uses The Photographer's Ephemeris application to explain many of the points presented.

The Photographer's Ephemeris is available free (as a desktop edition) at Stephens site http://photoephemeris.com. It is also available as a great iPad version and also an iPhone version on the Apple app store.

Rather than a point-by-point 'how to' manual, the book explores at a high level some of the science behind natural light, and illustrates key points with a number of case studies where I explain the thinking and planning behind some of my images.

The eBook is now available from my online-store.

Scottish Natural Heritage Photography Fair

I'm pleased to confirm that I will be giving a talk (40 minutes) at the Scottish Natural Heritage photography fair this September (both days - Saturday the 3rd and Sunday the 4th). The fair is held in Battleby near Perth, Scotland. If you'd like to come and see me talk about my travels and photography, you can book tickets on the SNH site. I am attending both days.

Understanding Light

I'm really excited to let you all know that at the end of the week, Understanding Light with the Photographer's Ephemeris, will be released. Notification about the release of this eBook will be first notified through my monthly news letter. If you're not a member of my news letter - you can subscribe on my home page.

Both Stephen Trainor (the creator of the Photographer's Ephemeris) and myself have been working on this eBook for quite some time - it's been quite a journey, initially starting off with me trying to put something together last year about the application, and then Stephen getting involved. We both feel it's a really good read now.

If you don't know what the Photographer's Ephemeris is, it's a really useful application I use to plan some of my landscape photography shoots. It provides information on sunrise and sunset times, twilight times, angle of sun and direction of sun throughout the day too. If you'd like to read more about it - then please go to Stephen's web site where you can also download the free desktop edition of it.

It's also available for the iPad and iPhone - my favourite version is the iPad version, which is great for taking with you while you're out and about.

Anyway, just a little heads up to keep an eye on your inbox this week for news of the eBooks release.

Ansel Adams in Colour

I've been pretty quiet of late on my blog, and this has been for good reason. The past few weeks since I returned home, I've been busy preparing my first cloth bound book for printing. It's been a long haul, but I think that anything worth doing, should be done properly.

Doing a book requires a lot of preparation. You may think the choice of images would be the hardest part, but it's been a huge learning curve.

Firstly there is the cost of doing a book, learning about paper types and also, getting past the jargon that printers talk in. There is also the question of storage and distribution to overcome - where exactly do you store 1,000 books?

The good news is that the Quark express file is almost ready now. I spent the early part of this week in Nottingham with my friend Darren putting the layout together. We've got some beautiful fonts in there and the layout is simple yet elegant. The ISBN number has been allocated and the preface has been written by someone whom I admire the work of greatly. The book will be released by Half-Light Press. Estimated release date is the later half of October, early November, but I will preview a proof copy of the book on this blog when the printer sends me one.

So why the title 'Ansel Adams in Colour'? Well, I guess the past few weeks, as I've been busy looking at samples of paper types to use for my own book ( I have settled on a fine Japanese art paper), I've been busy plundering my ever growing collection of fine photography books for comparisons. One such title that I hadn't looked at for a long time is Ansel's book about his colour photography.

Apart from the fact that it's beautifully printed on the finest stock Silk paper I can imagine, I'd almost completely forgotten that Ansel shot colour at all.

This brings up an interesting aspect for me. I feel that photography that is considered 'art' is often black and white. Certainly, I'm in awe of the medium, despite that I don't shoot it myself. But what of Colour? Why has it not been embraced so steadily by the photographic art world? Well, I think if we look inside Adam's book, it's clear to me that Ansel had trouble with the medium. That's not to say his work was bad. It's rather beautiful in fact to see very Adams-like compositions, but done in colour. The thing is though - he was troubled because he lacked the degree of control that he wanted over colour. Ansel was no black and white purist, and is often noted to have looked forward to the digital revolution and the means to control colour the way he wanted to. I feel that perhaps, since the amount of dark-room control that was ever present for Black and White, allowed it to establish itself more than Colour could. Colour has been a late developer (no pun intended).

So what of Ansel's book. It's a great read. It's also interesting to see how he grappled with the problems of working with early colour and how he failed (too strong a word) to reach his vision with the medium. I personally think this book is a very important document, illustrating the trials of colour, how it was perceived by the generation of the 40's and 50's.

Maybe you didn't know that Ansel had made colour images? If so, then I can recommend this book as it's a beautiful edition and I feel, should be part of every landscape photographer's 'core' book collection.

It turns out that the book has been revised and expanded since my early 90's edition, and unfortunately - is now out of print. So if you're interested in this title, my review is based on the 1st Edition, and you can get a copy of it on AbeBooks.com.